

 ARTS & SCIENCES COMPUTING
Wireless access at Penn consists of:
- How to set up AirPennNet on Windows
- How to set up AirPennNet on macOS
- How to set up AirPennNet on iOS
- How to set up AirPennNet on Android
AirPennNet
AirPennNet is the WiFi network used throughout all of Penn's campus. You can connect to this using AirPennNet-Guest, allowing you to access the Internet from anywhere on campus. More information from ISC's Using Wireless at Penn page can be found here: https://isc.upenn.edu/using-wireless-penn
How to set up AirPennNet on Windows
On a Windows device you can connect directly to AirPennNet. The user name is your Pennkey, and password is your Pennkey password.
 Back to the top
How to set up AirPennNet on macOS
- Join the "AirPennNet-Guest" network
- A window will pop up with 2 buttons, Connect with my Pennkey or Guest Access. Click Connect with my PennKey

- On the next screen click Connect with my PennKey
- Your default web browser should open with a Configure and connect to AirPennNet webpage. Make sure Configure via dissolvable Agent is selected, then click JoinNow

- WiFi_JoinNow_Wrapper.dmg will be downloaded. Find the file, then open it to start the installation process
- Once started, you'll get to a SecureW2 JoinNow window. Click Next to start

- Through the installation a PennKey login window will be displayed. Enter your Pennkey and Pennkey password as you normally would, and click Log in

- A new window should display with authentication successful. SecureW2 JoinNow will ask for your computer user name and password. After entering this, you'll see a notification about Profile Downloaded. From here, click the Apple at the top left, then System Settings, General, and scroll down to Device Management. Find the University of Pennsylvania AirPennNet profile, double click it, then click Install...

- Click through any remaining windows until you see that SecureW2 JoinNow app has successfully configured the AirPennNet network

If you have trouble or this does not work contact your IT Support for assistance.
How to set up AirPennNet on iOS
- Open Settings, select Wi-Fi, then select AirPennNet-Guest
- After a few seconds, a window should pop up with 2 options. Select Connect with my PennKey
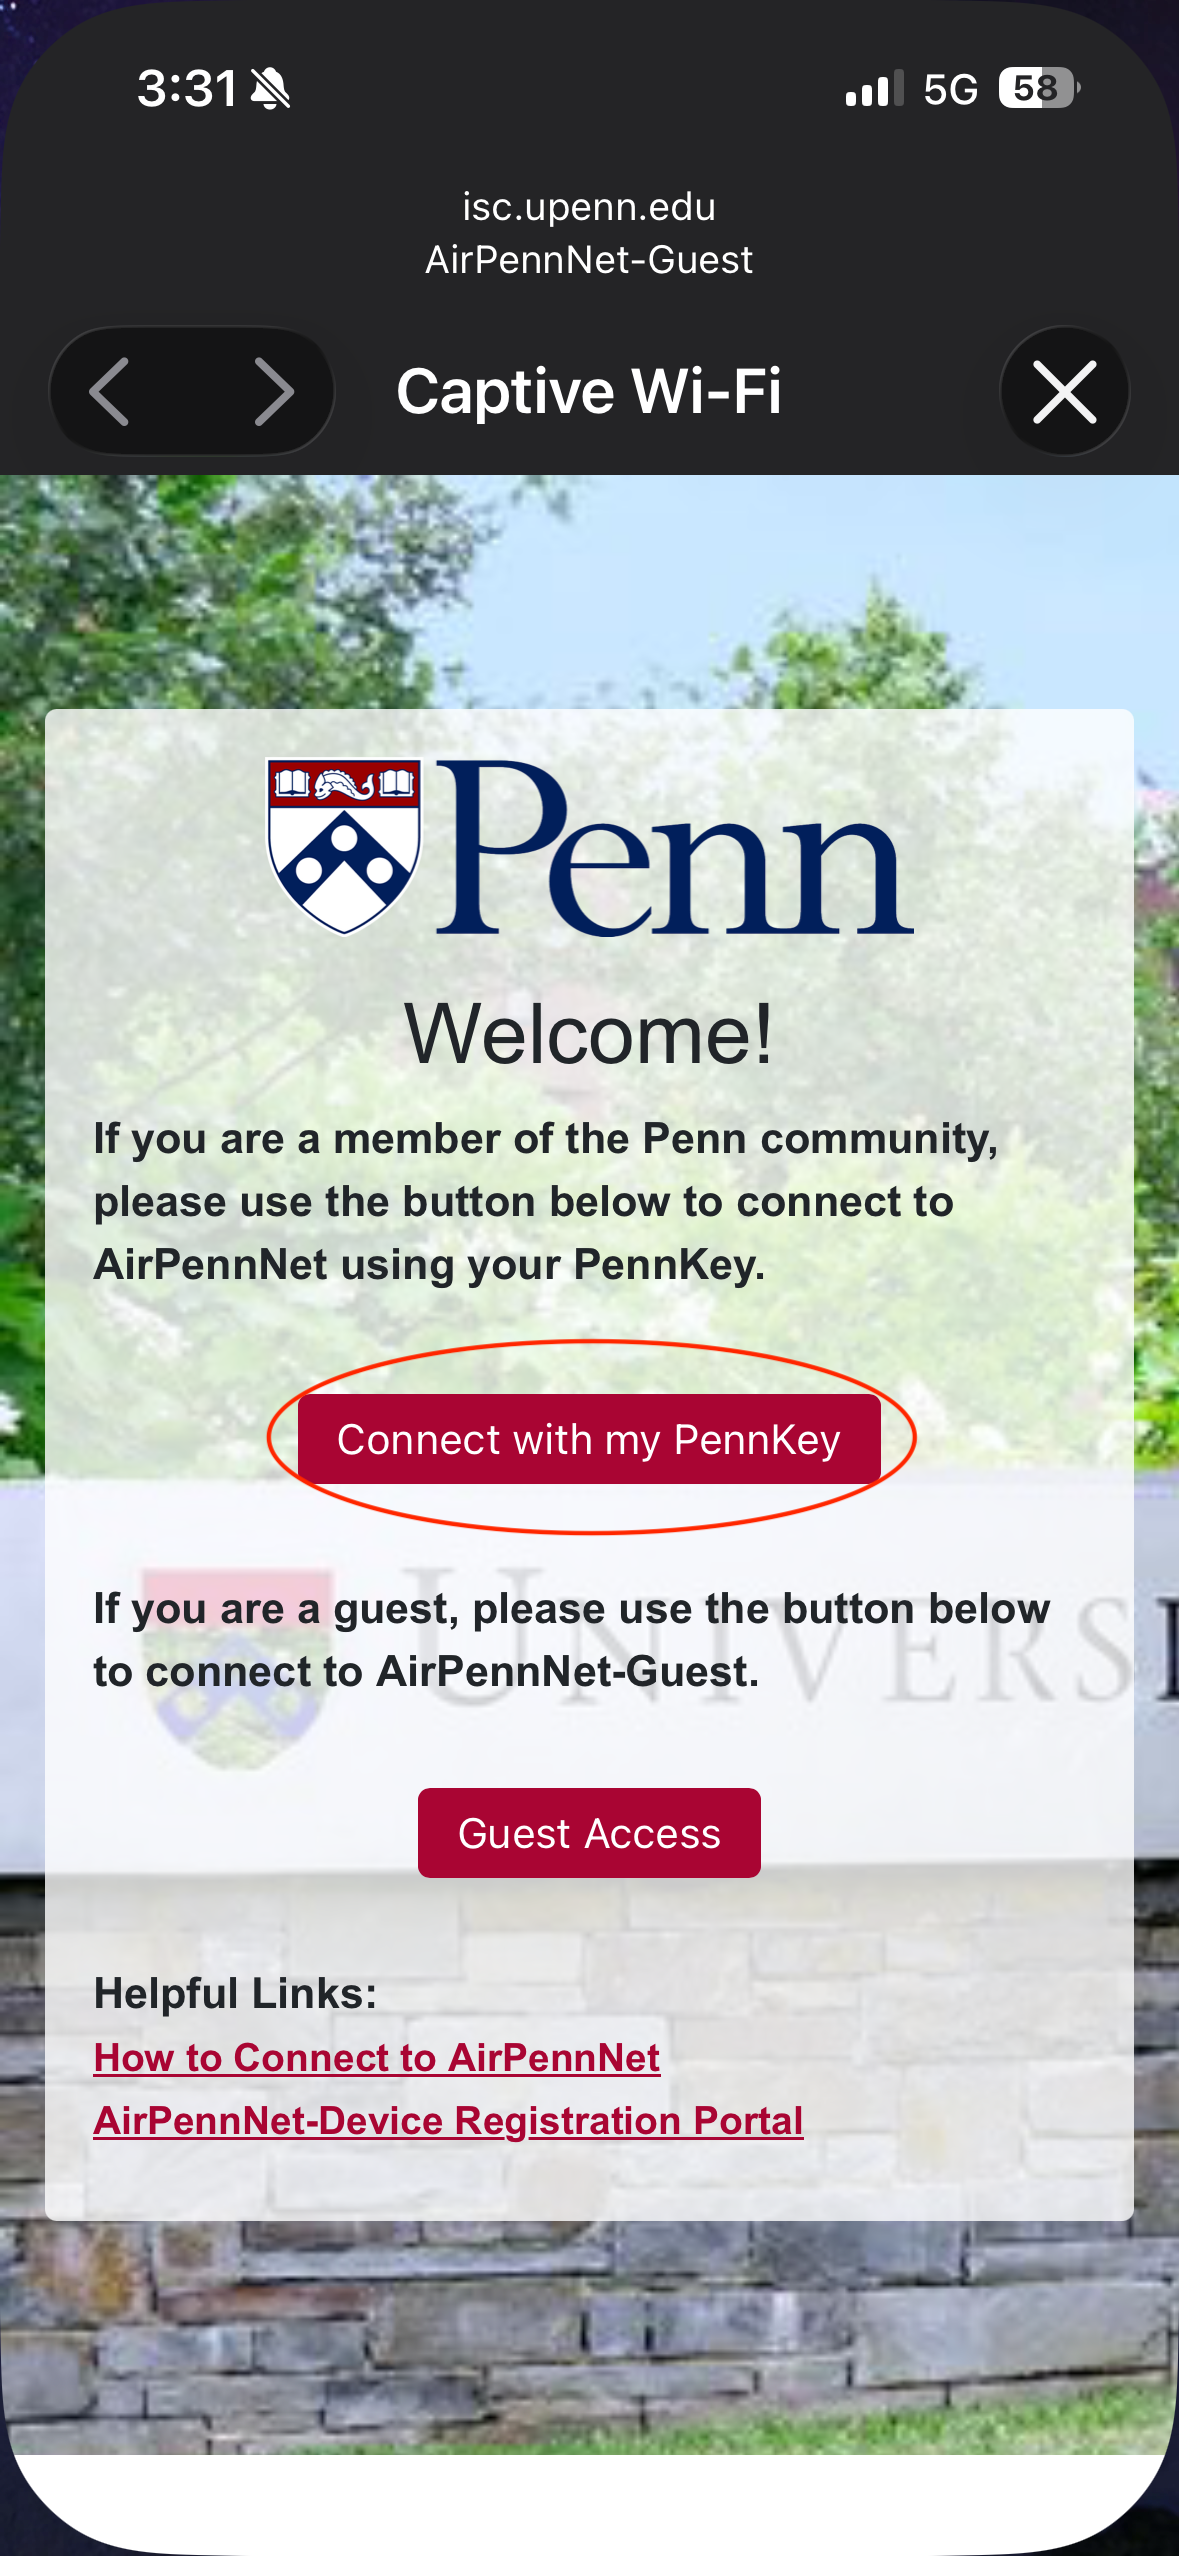
- Select Connect with my PennKey on the next window
- If you are not using Safari as your web browser, the web page will say We have detected that you are using an incompatible browser. Please open this URL using your Safari browser.
Copy the url and paste into Safari to continue. - Select Sign In on the Configure and connect to AirPennNet page
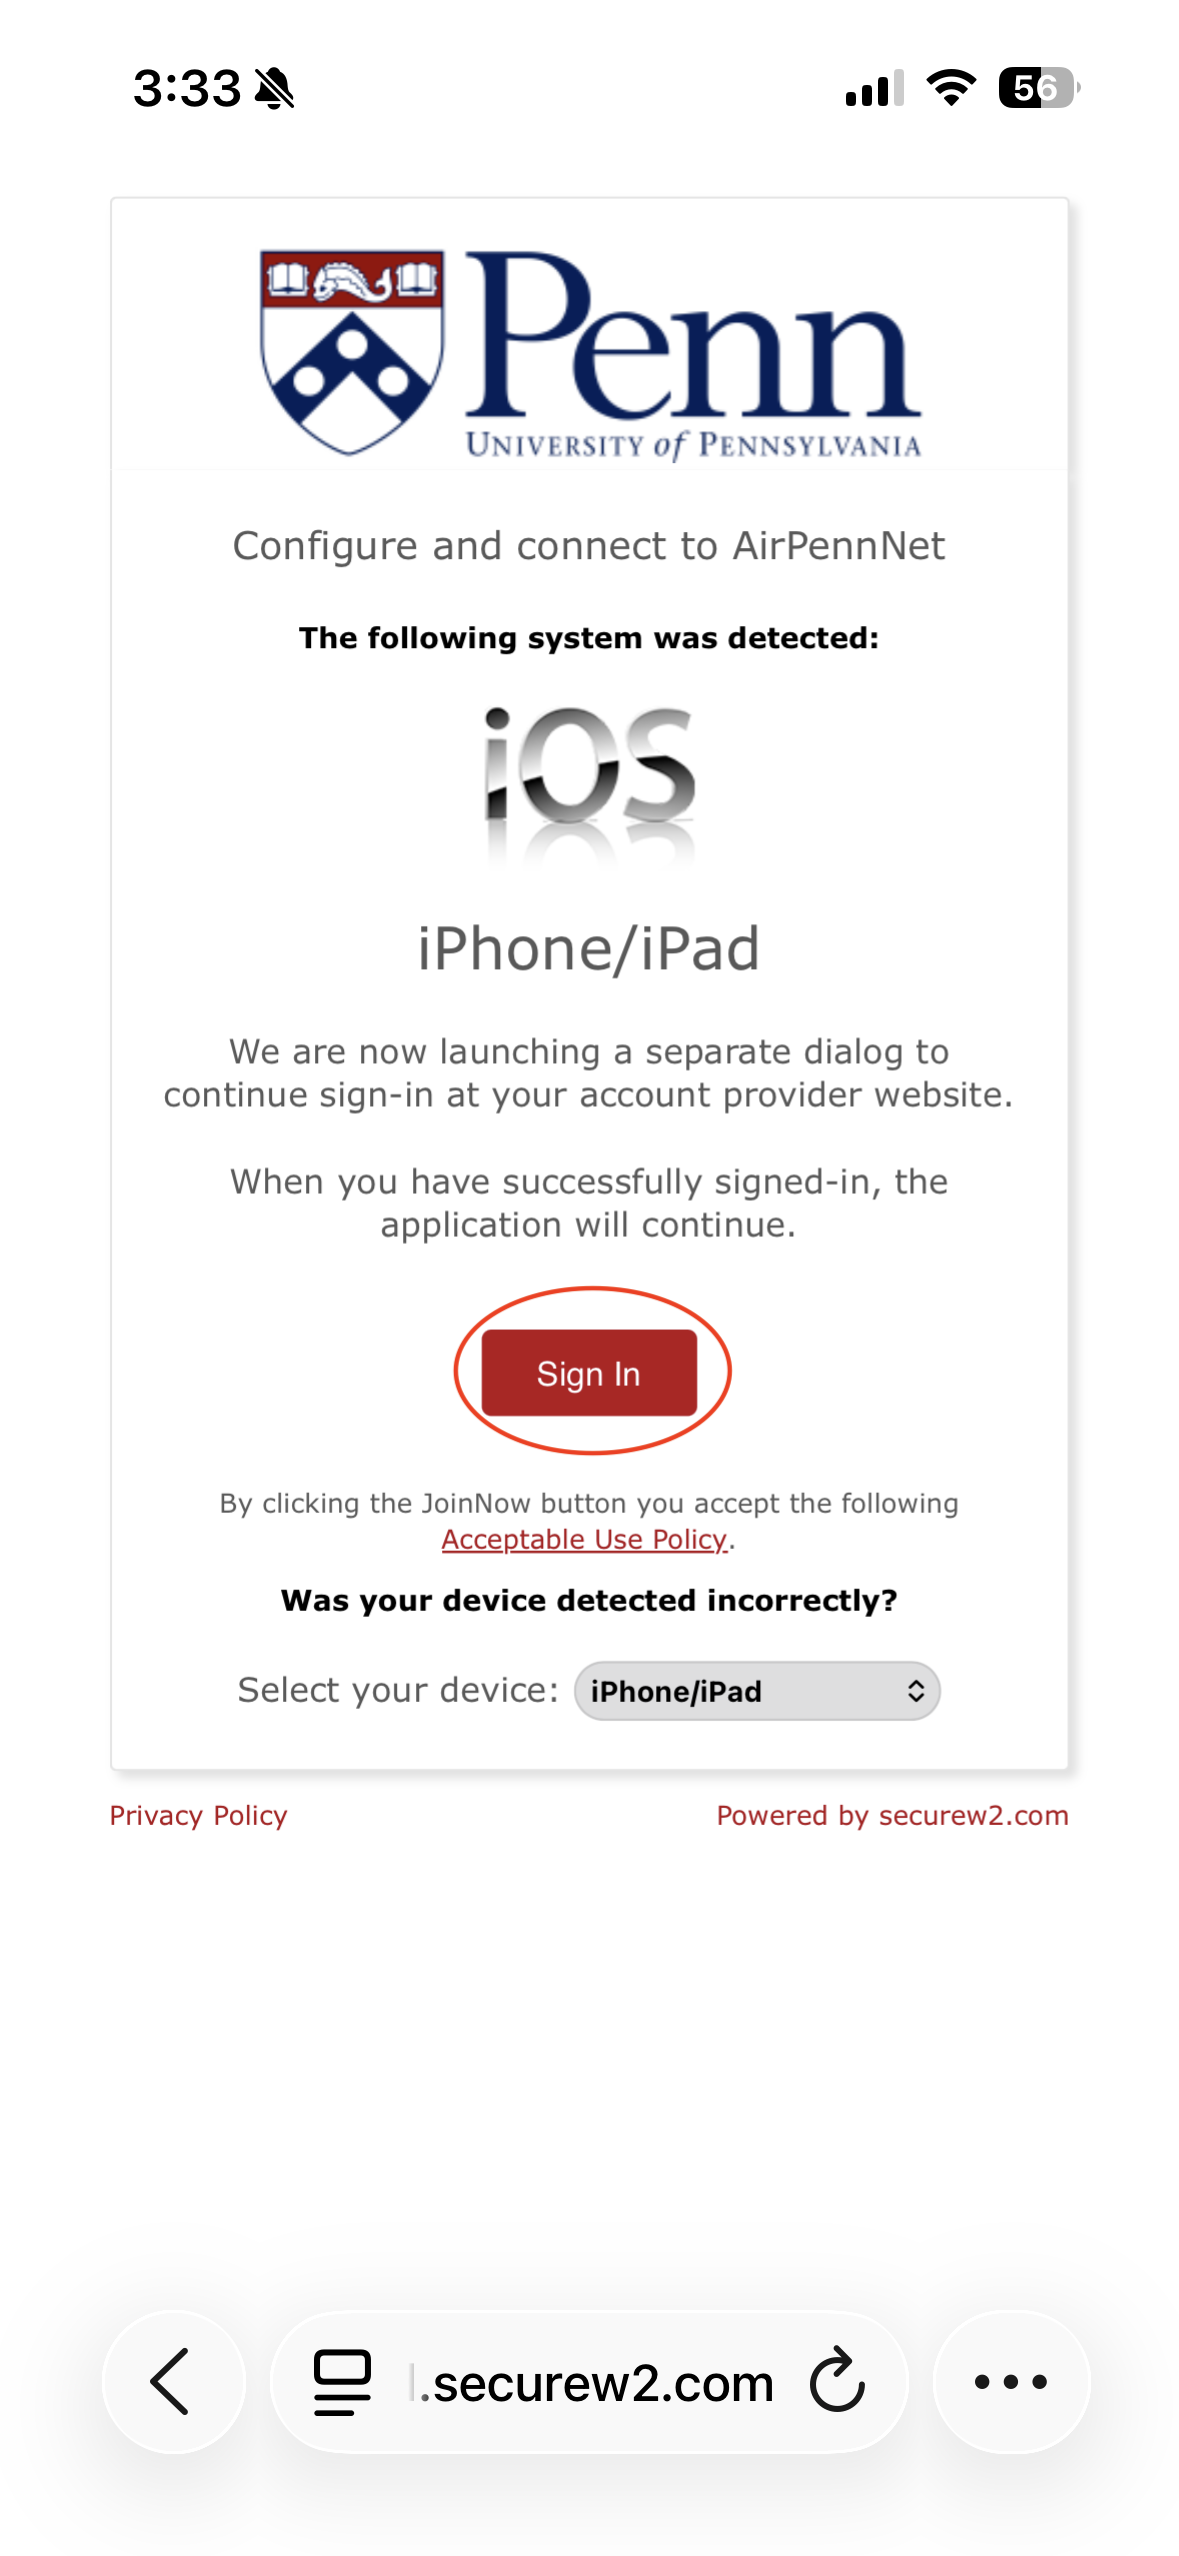
- Your web browser should open again asking for Pennkey and Pennkey password
- A configuration profile will ask to be downloaded. Click Allow
- If asked to choose device, select the device you want to set up on AirPennNet
- Next, open Settings and select the Profile Downloaded option
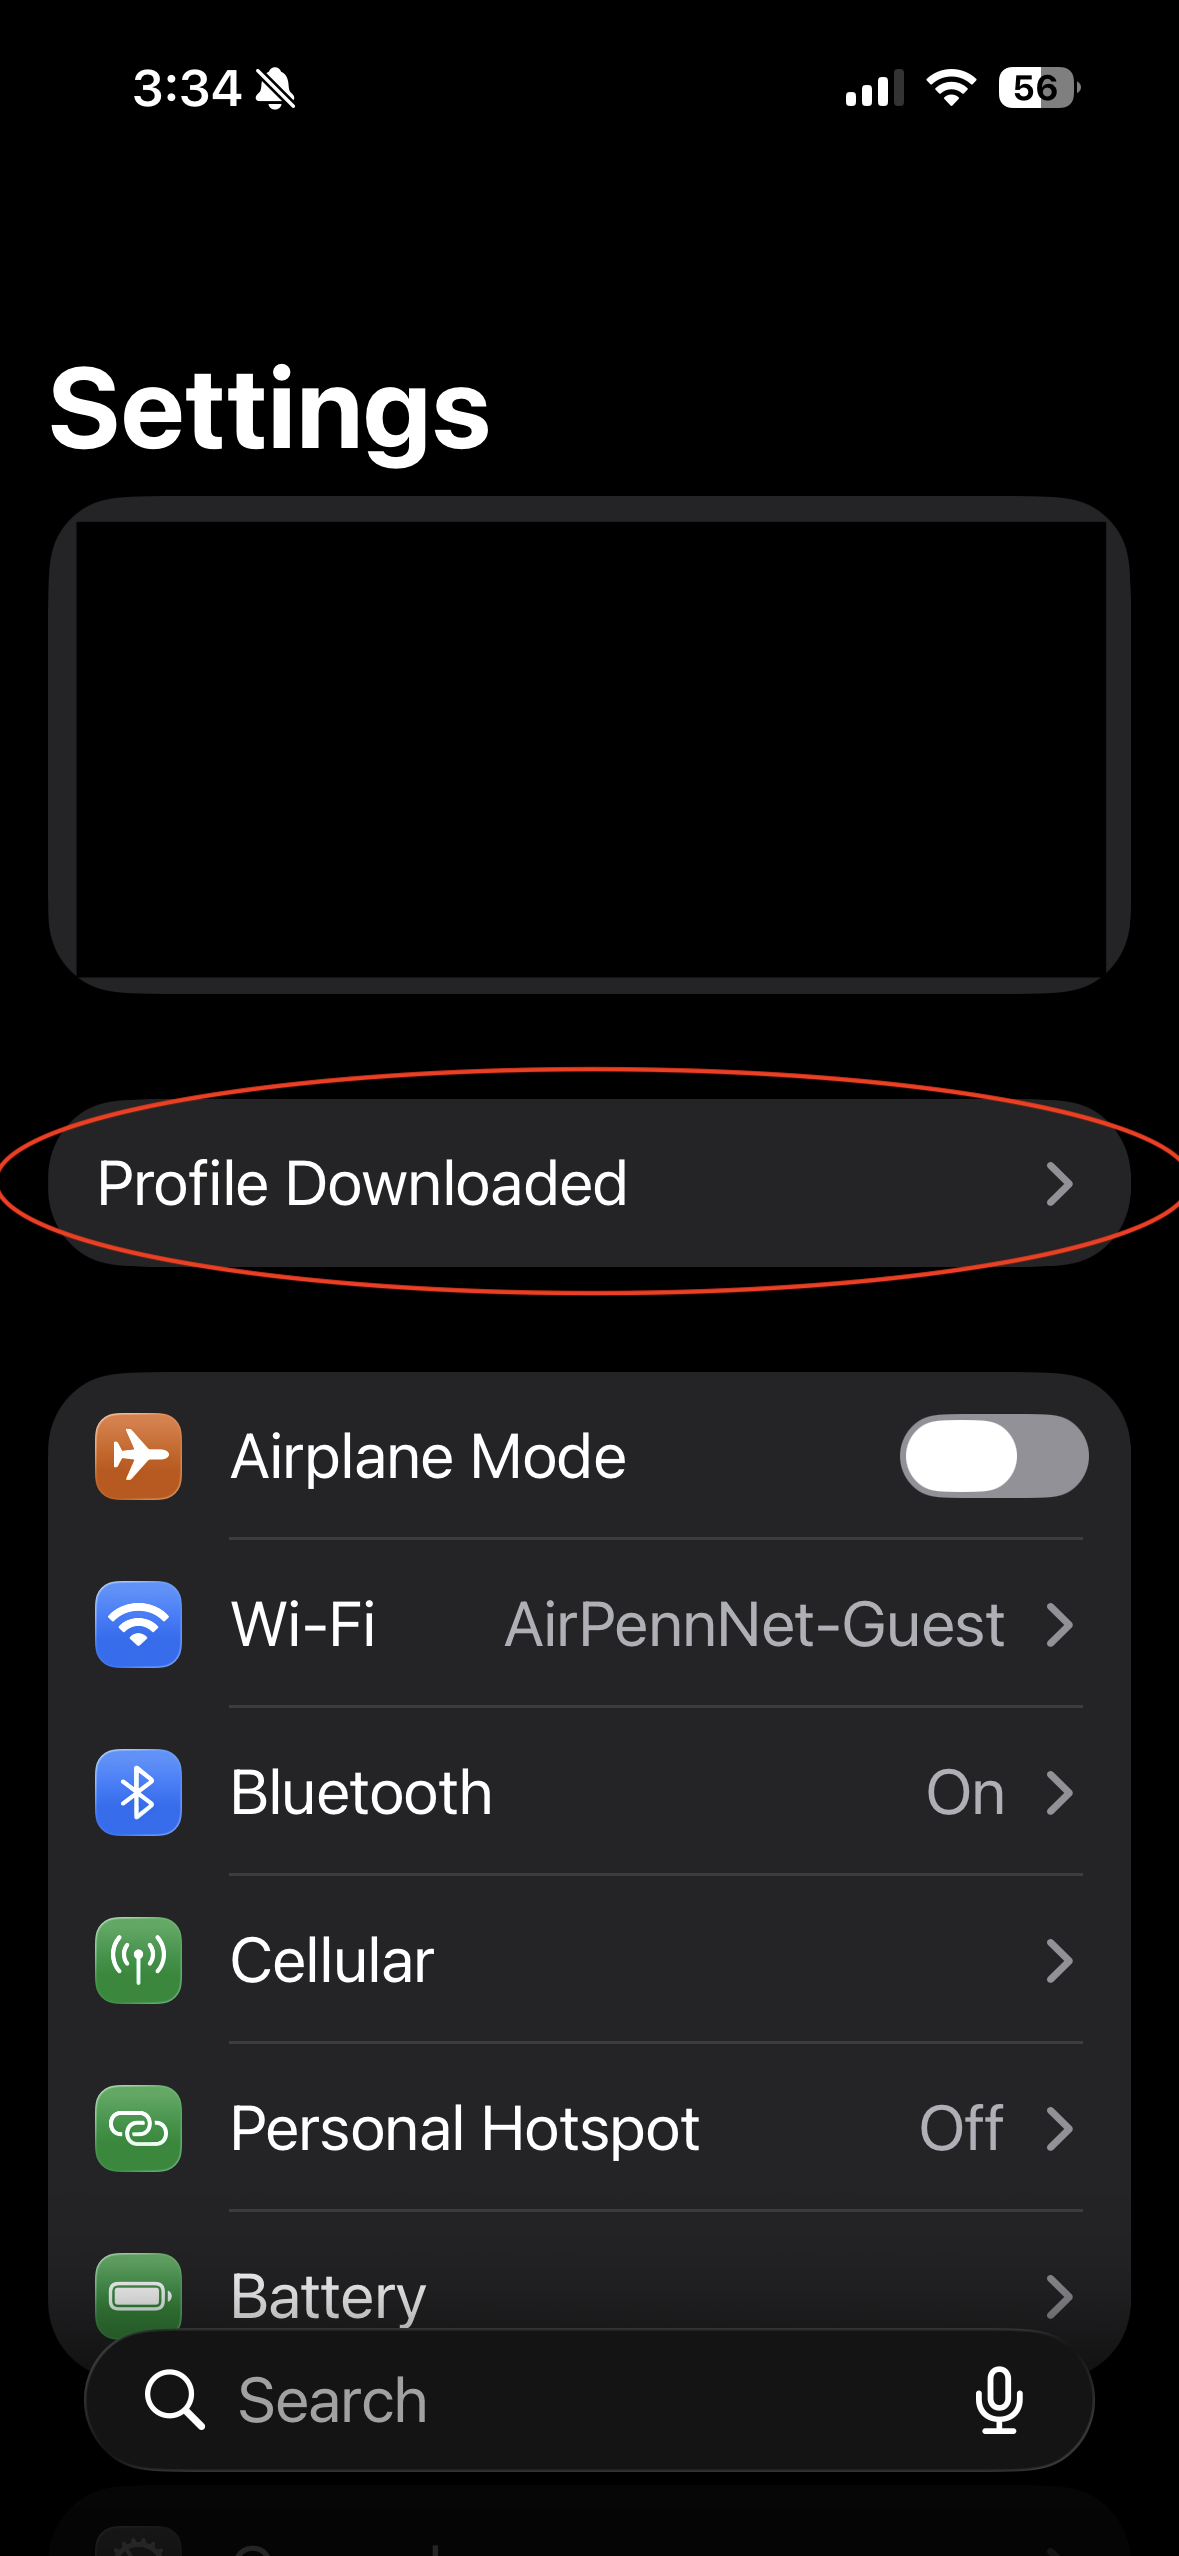
- This should open an Install Profile window. Select Install
- You'll be asked to enter your iPhone or iPad passcode
- After entering your passcode, select Install, then Install again on the window that pops up
- You should see a window that says Profile Installed. Select the Checkmark
- VPN & Device Management should now open, with a University of Pennsylvania AirPennNet MobileConfig under Configuration Profile
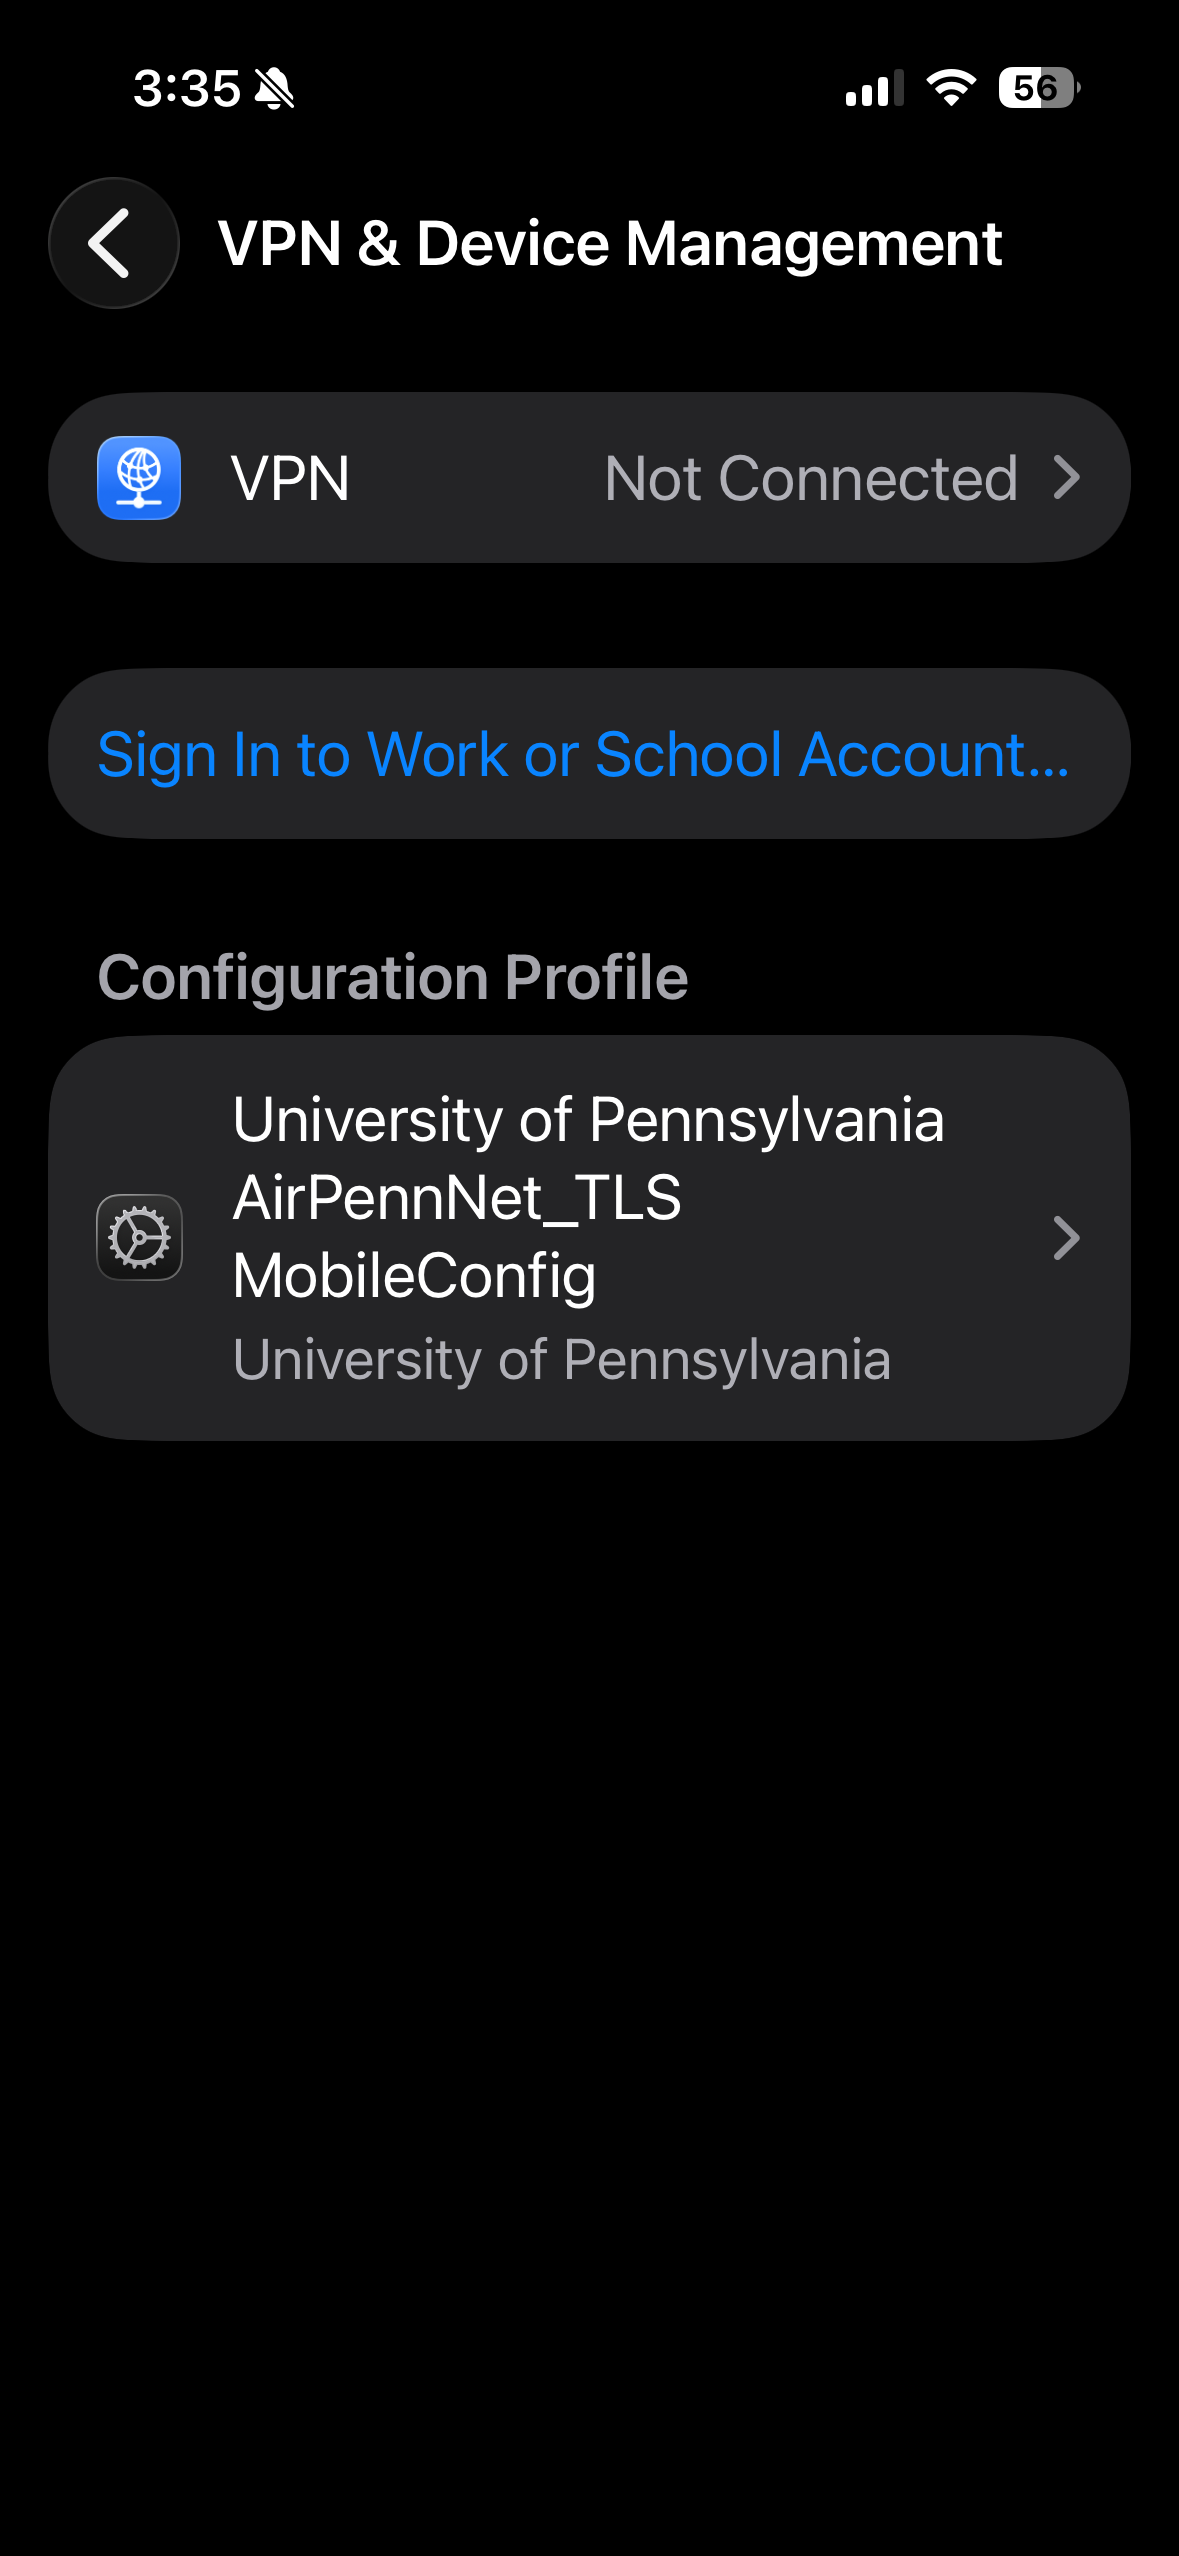
- Test out connecting to a web page to confirm you have Internet access
If you have trouble or this does not work contact your IT Support for assistance.
How to set up AirPennNet on Android
Select AirPennNet, then enter the following information manually:
Instructions pulled from "configure my device manually" here: https://isc.upenn.edu/using-wireless-penn
- Wireless Network Name (SSID): AirPennNet
- Security Type: WPA2-Enterprise
- Encryption Type: AES
- EAP Method: TTLS
- Phase 2 (Inner Method): PAP
- Root CA Certificate(s): Can use system default certificates on device, when available
- Domain: Blank
- If you cannot tap Next or Connect without something entered in this field, put "upenn.edu" without the quotes
- Anonymous Identity (Outer Identity): Leave blank
- Username (Identity): your PennKey username
- Password: your PennKey password
If you have trouble or this does not work contact your IT Support for assistance.
Where to find assistance:
- SAS Faculty/Staff — SAS Computing, Local Service Provider (LSP)
- Penn Undergrads in College Housing — College House Computing, Information Technology Assistant
- Penn Graduate/LPS Students and Undergrads (off-campus) — Information Systems & Computing, Tech Center
Key Features:
- Encryption — traffic is encrypted to help protect data if intercepted
- Easy Configuration — only requires a valid PennKey
- Campus-Wide Availability — see ISC Networking wireless topology for details
AirPennNet-Guest
AirPennNet-Guest is a wireless network for use by visitors to Penn. It has limited bandwidth and no encryption. It requires a valid email address, which must be must be registered daily.
How to get onto AirPennNet-Guest
- Select the AirPennNet-Guest network from list of wireless networks
- A pop-up window should appear asking for an email address
- Enter email address and follow the on-screen instructions
AirPennNet-Device
AirPennNet-Device is a wireless network that is intended for devices such as Amazon Echo, Kindles, gaming consoles, door locks, and temperature monitors.
For more information, consult AirPennNet-Device information from ISC. The link to the Device Portal is https://device.upenn.edu/.
For More Information
As with wired networking, SAS Computing staff coordinate closely with ISC Networking in providing wireless service. For more information about wireless connectivity on campus, please visit ISC Networking.
For further assistance, contact your Local Support Provider.