Here are instructions for creating PDF files in various computer systems.
In Microsoft Windows
Recent versions of Microsoft Office allow you to export a document as PDF.
- Open your document.
- Select File. In the menu that appears, select Export.
![[export as PDF]](/system/files/styles/full_width/private/win-export-pdf.png?itok=sWLh3yZ0)
- Click the Create PDF/XPS button (circled in the screenshot above). The next window will appear.
![[publish PDF]](/system/files/styles/large_width/private/win-publish-pdf.png?itok=cXI0bJXX)
- Select a location where you wish to save the file, name the file (preserving the ".pdf" extension), and click the "Publish" button.
In Mac OS
The ability to create PDF files is built into the Macintosh operating system. Go to the File menu and select "Print" as you normally would to print from Microsoft Word (or any other program). You'll see a button in the lower-left corner of the print dialog that says "PDF." Click this button and select Save as PDF from the menu that appears.

Then select a location to save the file and you are done.
In Ubuntu Linux
OpenOffice documents can be exported as PDF. Select the menu item File > Export as PDF.
After clicking on "Export as PDF", a PDF Options window opens.
On the General tab, be sure that PDF/A-1 and Lossless compression are checked. The PDF/A-1 option embeds the fonts.
Click the Export button. Then give the PDF file a name (preserving the ".pdf" extension) and click Save.
Moving PDF Files
When moving the PDF file electronically, be sure that it is moved as a binary file. Otherwise the file could be corrupted. Trying to open a corrupted file with Adobe reader will result in an error: "There was an error processing a page. Invalid Color Space."
Check that Fonts are Embedded
To ensure that the electronic version matches the print version, all fonts used must be embedded within the PDF file. To be sure that the fonts display as expected, the PDF file with embedded fonts must be created on the same machine as the document files.
There are two quick ways to determine if fonts have been embedded in a PDF file.
In Adobe Reader
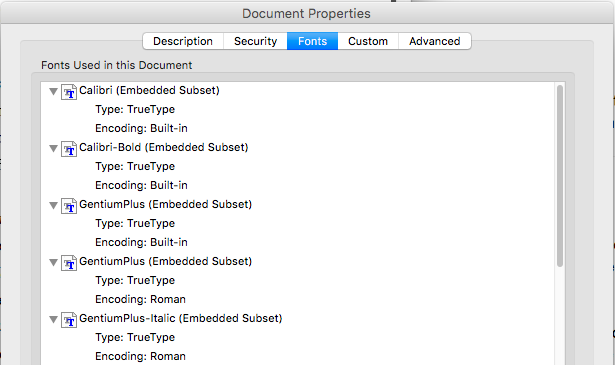
The more universally available way is to use the Adobe Reader. With the PDF file open, select File > Properties. In the Document Properties window that opens, click the Fonts tab. If the font has been embedded, it will be noted in parentheses following the name of the font. The following screen shot shows the font tab for a PDF file. The parenthetical note "Embedded Subset" after each font's name indicates that enough of the font has been embedded to render the saved text.

In Ubuntu
In Ubuntu, the utility pdffonts can be used used from a terminal window. Enter the following command.
pdffonts <name of PDF file>
The following is an example of the output when only some of the fonts are embedded:
Name                                 type              emb sub uni object ID
------------------------------------ ----------------- --- --- --- ---------
DMCZLT+Century                       TrueType          yes yes no       9  0
DMCZLT+Garamond                      TrueType          yes yes no      12  0
PGUGBG+Georgia                       TrueType          yes yes no      14  0
Courier                              Type 1            no  no  no      11  0
RXNQOL+MicrosoftSansSerif            TrueType          yes yes no      16  0
PGUGBG+Tahoma                        TrueType          yes yes no      18  0
Times-Roman                          Type 1            no  no  no       7  0
TWPWAV+TrebuchetMS                   TrueType          yes yes no      20  0
Helvetica                            Type 1            no  no  no       8  0
DMCZLT+Verdana                       TrueType          yes yes no      22  0
The emb column tells you if the font is embedded. Note that Courier, Times-Roman, and Helvetica are all no, while the others are all yes.
Compare this with the following example, in which all fonts are embedded.
name                                 type              emb sub uni object ID
------------------------------------ ----------------- --- --- --- ---------
VNZQXL+CourierNew                    TrueType          yes yes no      13  0
DMCZLT+Garamond                      TrueType          yes yes no      15  0
PGUGBG+Georgia                       TrueType          yes yes no      17  0
RXNQOL+MicrosoftSansSerif            TrueType          yes yes no      19  0
PGUGBG+Tahoma                        TrueType          yes yes no      21  0
RXNQOL+TimesNewRoman                 TrueType          yes yes no       7  0
TWPWAV+TrebuchetMS                   TrueType          yes yes no      23  0
PGUGBG+Arial                         TrueType          yes yes no       9  0
DMCZLT+Verdana                       TrueType          yes yes no      25  0
DMCZLT+Century                       TrueType          yes yes no      11  0
For Assistance
For further assistance, please consult with your Local Support Provider


 ARTS & SCIENCES COMPUTING