Here are instructions for sharing your PennO365 Calendar in Outlook Web App (OWA).
-
Open your PennO365 account via Outlook Web App (OWA). When signing into your PennO365 account on the web, remember that you are signing in enter your PennO365 Account Name (e.g., not ). If you do not remember your PennO365 password, you can reset here.
-
Go to the Calendar.

-
Click on the Share button at the top of the screen.

-
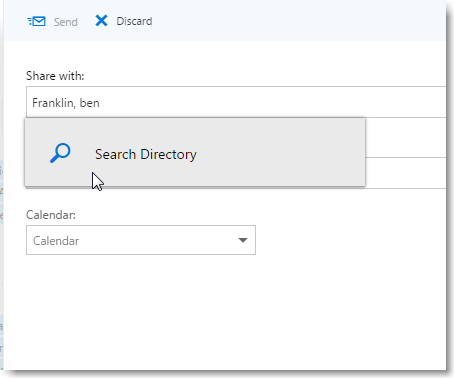
Type the name or email address of the person you want to share your calendar with in the Share with box. If person's name doesn't show up, choose Search Directory. This box works like the To box in an email message. You can add more than one person.

-
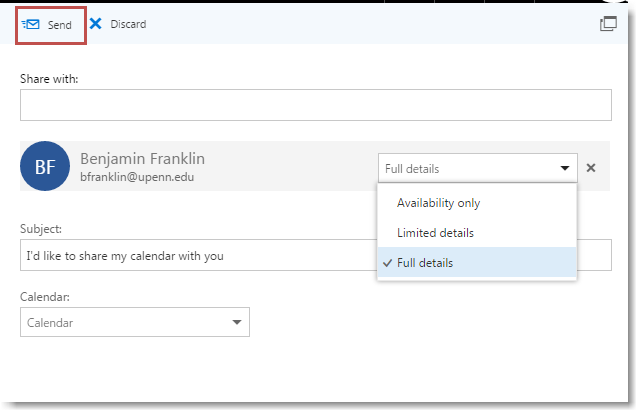
After you add who you want to share your calendar with, choose how much information you want them to see. Full details show the time, subject, location, and other details of all items in your calendar. Limited details show the time, subject, and location, but no other information. Availability only shows the time of items on your calendar and no other details, this is the default setting for everyone who uses PennO365 and is set automatically.
-
You can also give someone permission to edit your calendar by choosing Can edit or Delegate. An editor can edit your calendar. A delegate can edit your calendar, and can send and respond to meeting requests on your behalf. For more information about editor and delegate access, contact your Local Support Provider.
-
You can edit the Subject of the message, if you want.
-
After you finish adding people to share with, setting their access levels, and choosing which calendar to share with them, choose Send.

-
Each person in your organization with whom you share your calendar is sent an invitation in an email message telling them that you've shared your calendar.
If you have any trouble, you can contact your Local Support Provider for assistance.


 ARTS & SCIENCES COMPUTING