Contents:
One of the most common uses for Adobe Photoshop is to prepare images for use on a web page. Here we will go through a few of the basic steps that you will probably need to take before placing any images into a web page. These instructions take into account that you already have an image to work with.
1. Opening the image
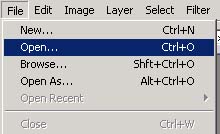 |
Open the image by using the File:Open command and selecting your image. |
2. Zoom
 |
Before you do anything, to get an idea of the actual size of the image, click on the zoom box in the bottom left hand corner of the screen and adjust this value to 100% by typing in 100 and pressing the enter key. |
3. Adjusting Image Size
You should think about where you plan on placing your image in your web page. If you want it to be the focus of your web page, then you will probably want it to be relatively large. However, if you plan on having it simply added as an element within your page, then you would make it considerably smaller, such as the pictures on this page.
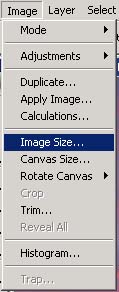 |
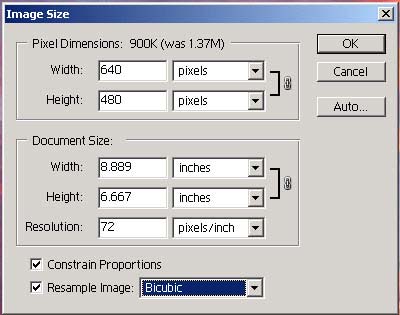
Once you have decided how big you would like your photo to be, go to the Image Size option in the Image menu (Left). This will bring up the dialog box shown on the right. You can adjust the size of the image using the top two boxes for width and height. Note, that while the Constrain Proportions box is checked, it will automatically adjust the height as you adjust the width and vice versa so as to keep the aspect ratio of the image correct. Secondly, make sure that the Resolution is set at 72 pixels/inch which is the standard for the web. |
 |
4. Rotating The Image
Many times you will take a photo with the camera sideways and need to rotate the image, or you will scan it in upside-down by accident. This can be rectified using the rotate tools:
 rotate canvas > 90° CCW]" height="282" width="258"> rotate canvas > 90° CCW]" height="282" width="258"> |
Going to Image: Rotate Canvas will give options, all of them self explanatory to rotate your image. If your image is only slightly skew, then you can use the "Arbitrary" setting to rotate it by a specific number of degrees clockwise or counterclockwise. |
5. Adjusting Color Settings
A lot of the time when getting images from digital cameras or scanners one may still encounter the same issues as you would if you had taken the photos with a film camera. These digital photo sources are still prone to the same issues of over or under-exposure, incorrect white-balance and hue problems. Luckily photoshop includes a lot of ways to correct these problems.
5.a) Auto Color:
If an image seems too warm (too orange) or too cool (too blue) this generally means that the white balance is off. You can use the "Auto Color" feature to adjust this automatically. With the file open, click Image:Adjustments:Auto Color. Photoshop will try to adjust the white balance to natural levels. If you don't like the outcome, you can click Edit:Undo (Ctrl-Z) to undo the change.
| Original | Auto Color |
![[original picture]](/sites/default/files/images/photoshop_independenceoriginal.jpg) |
![[auto-colored picture]' height=](/sites/default/files/images/photoshop_independenceautocolor.jpg) |
The original image was very warm and orange looking and the Auto Color command cooled the image dramatically to create a perhaps more realistic looking picture.
5.b) Auto Levels
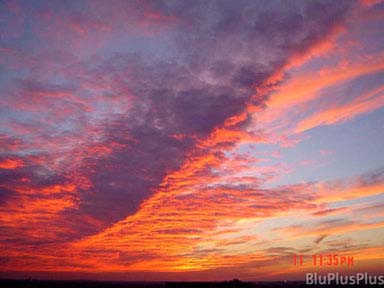
It is also possible that sometimes a picture can simply have too much of a certain color in it. Using the Auto Levels feature can adjust these setting automatically to improve the quality of the image. It will create a similar, but not identical, effect to the above Auto Color feature:
Image:Adjustments:Auto Levels
| Original | Auto Levels |
 |
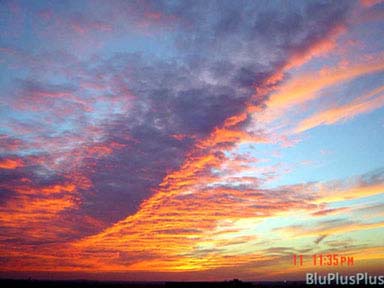 |
Here, by adjusting the levels of each of the three primary colors individually the Auto Levels feature has been able to make the blue of the sky stand out significantly better from the red of the cloud than in the original.
5.c) Auto Contrast
In images with very little variation between light and dark areas the auto-contrast feature will either enhance or smooth out these differences to make a better picture overall:
Image:Adjustments:Auto Contrast
Of course, Photoshop will also allow you to adjust and tweak all of these levels and settings manually, which can be needed sometimes if you are looking for a specific effect in a pictures - see below for instructions on the manual versions of Levels, Color Balance, and Contrast.
5.d)Levels
Clicking Image:Adjustments:Levels will bring up the following dialog.
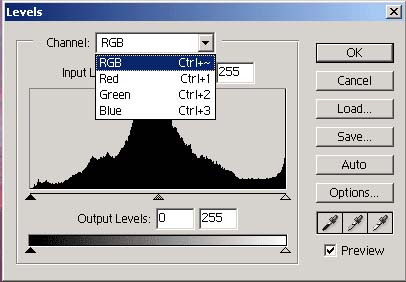 |
This is a rather cryptic dialog box which can be a little confusing at first. At the top left of the dialog you will see "Channel" which gives you the options shown. The drop-down menu under RGB, will allow you to select and manually adjust the red, green and blue levels individually. Below this you will see a histogram visualization of the amount of that particular color (such as Red) that is in your picture, ranging from very dark red on the left to very light red on the right. Beneath the histogram there are three small triangles that you can drag. The one on the very left affects the black level. In other words this is how dark red has to be before it is simply shown as black. Moving this to the right will cause darker reds to be shown as black. |
The triangle all the way over to the right does the opposite, changing how bright a shade of red has to be before it is shown simply as white in your image. Moving this triangle to the left will cause lighter reds to be represented by white, and hence increase the overall brightness of the red parts of your picture.
You can play around with these settings for each of the separate colors until you have achieved a satisfactory look for your picture.
A great example of a use for this is if you have a picture of a beach and and want to brighten just the sea and the sky, but leave the beach looking the same brightness. In this case you would open the levels dialog and select the Blue channel. Then you would drag the right hand triangle toward the left and you will see that the sea and sky will become brighter, but the beach will stay the same brightness as it doesn't have much blue in it.
5.e) Color Balance
Clicking Image:Adjustments:Color Balance will bring up the following dialog:
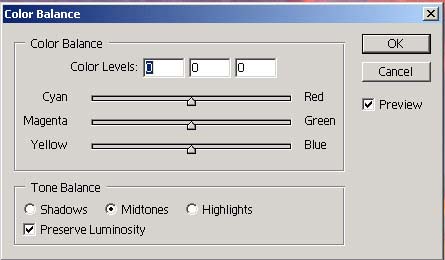 |
With it you can manually do the same things that the Auto Colors feature does. At the bottom there are three selectors, for "Shadows" "Midtones" and "Highlights." This affects the parts of the image you will change as you edit the other settings. If you select "Shadows," for example, you will only be affecting the dark parts of the photos, and "Highlights" will affect the bright parts. With one of these selected, you can then adjust the hue of each of the colors. |
So if you want to have a sky that is bluer than everything else in your picture, you would select "Highlights" (because the sky is usually brighter than everything else) and then slide the bottom slider to the right towards blue. This can be used to tweak images to make them look more realistic or to create interesting effects.
5.f) Brightness and Contrast:
Clicking Image:Adjustments:Brightness/Contrast will bring up the following dialog:
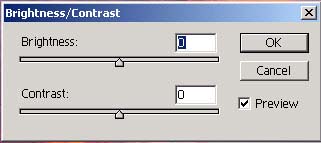 |
This is a very self explanatory dialog. If you want to brighten the picture overall, you drag the Brightness slider to the right, if you want to darken it, drag it to the left. If there is too much variation between light and dark areas of your picture, |
then drag the Contrast to the left, to decrease the contrast between light and dark. If there is not enough contrast between dark and light parts of your image making your image look very flat, then increase the contrast.
6. Editing the image:
Now that you have the color and size of the image correct, we can start to edit the image itself. We are going to use two very simple tools, the Crop tool and the text tool.
6.a)The Crop Tool
The crop tool is used when you only have a smaller part of the picture that you want to keep, and you want to discard the rest of the image. For example, if you have a picture of you and a friend, but would only like a picture of yourself, you would use this tool to keep the half of the image with you in it and discard the half with your friend in it.
In the tool bar on the left of the screen select the Crop tool:
![]()
|
Now, click and drag a square around the part of the image that you want to keep. You can make fine adjustments to the size of the rectangle by dragging the boxes on each of the corners and the middle of each side to resize it. Once you are happy that you have selected exactly the right area, hit the "Enter" key on a windows computer or the "Return" key on a Mac. Everything apart from the area of your image that you had selected will disappear and be deleted. NB: If you delete the wrong part of the image you can always undo by using Edit:Undo (Ctrl - Z) |
![[The crop tool is selecting part of the image.]](/sites/default/files/images/photoshop_crop.jpg) |
6.b) The Text Tool
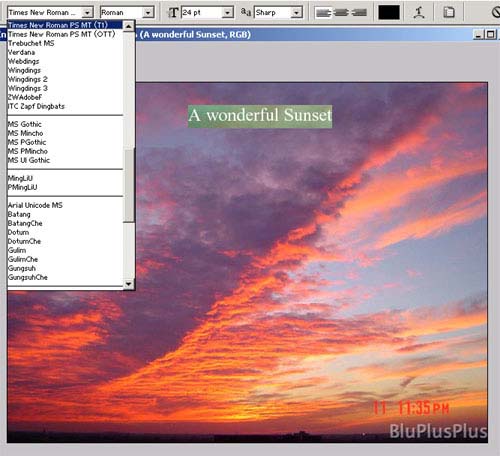
Many times you will find yourself wanting to add text to pictures, be it to add a caption, name different items in your picture or simply to add a fun speech bubble to someone in the picture. To do this select the Text tool from the tool bar on the left of the screen:
![]()
|
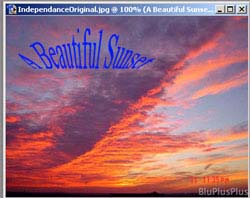
Click anywhere on the picture where you would like to add text. Type some text onto the image. Once the text is there, select it and you will notice that you have options for changing font, text size and alignment at the top of the screen. Once you are satisfied with the text, you may want to add some effects to it, such as a curve or some magnification. Clicking the Warped Text Tool |
 |
7. Optimizing for the Web
Chances are that by now you are ready to add your image to your web page. If this is the case, there is one last thing that you should do. You will need to save and optimize it for the web so that the file size is small and it is in a web-compliant format. Click File:Save For Web:
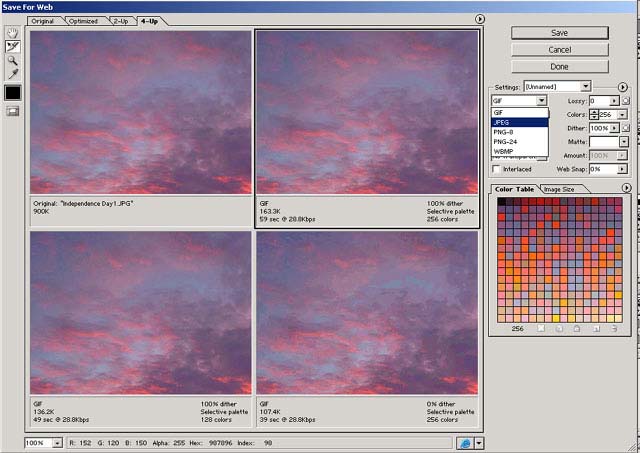 |
This will bring up a large box with 4 different versions of your photo. These are each previews of how your image will look using different formats to save it. The upper left hand one is the original file, there are then three other suggested versions for saving the file. |
Each preview will have details below it, including the format to be saved (In the case above, the one selected is GIF) and the approximate size of the file given the settings. Select the one where the image looks the best. You can then adjust the settings for that particular preview in the upper right hand corner. As a rule of thumb if you are saving a photo you want to use JPEG or PNG as your format, and GIF if you are saving a small graphic with only a few colors in it such as a company logo. You can then adjust other setting such as quality. Generally image size under 100K will be small enough to post on the web.
When you are satisfied with the settings that you have made, then click the preview of the image you want to save so as to select it, and then click "Save." You will then be prompted for a name and a place to save the file. When you have finished, click ok.
Congratulations, you have just edited and saved your first image in Photoshop.
Here are some useful books and sites for further reading:


 ARTS & SCIENCES COMPUTING